In Auto launched flow, the Scheduled Triggered Flow is one of the part of it. In this blog post let’s learn how to use schedule-triggered flow with examples and also how to use schedule path in salesforce flow.
Table of Contents
What is Schedule-Triggered Flows?
In normal apex class, when we want to run a job say overnight to process the data, we need to schedule a batch. So similarly now flows support a schedule-triggered flow with the frequency of, it can be run daily, weekly, and at once.
To summarize, we can use schedule-triggered flow in the below scenarios,
- To run daily or weekly.
- To run at a specific time.
- To process the bulk of records at a time.
- Run independent of a record change.
What is Scheduled Path in Record Triggered Flow
When you create any record-triggered flow, it will run whenever a change happens to the record. But by using the scheduled path, you can delay the record-triggered flow execution. You need to add a schedule for the path when to execute. These timings can be configured in the scheduled path as minutes, hours, days, and even months after the record change.
For example, 3 months before the end date, 2 days before any renewal date, etc.
Scheduled Paths vs. Schedule-Triggered Flows
Below is the difference between scheduled path and schedule-triggered flows.
| Consideration | Schedule-Triggered Flows | Scheduled Paths |
| Flow Type | Record-Triggered | Schedule-Triggered |
| Trigger | when a record is created, updated, or deleted | when a specific date and time |
| What Time | when a specified amount of time after the trigger or when a specified amount of time before or after a date on the triggering record | when a specific date and time |
| Frequency | Runs once for each time it’s triggered | Can run once, daily, or weekly |
Before You Start, consider the below checklist
- For schedule-triggered flows.
- Set the Default Workflow User – to run the schedule trigger, salesforce needs a user to run the flow. so add a default user.
- Add the Automated Process user email address – if the scheduled trigger needs to send an email, then configure the email address. Configure first in the organization-wide email address, then add it here.
- Set the Default Time Zone – schedule-triggered flows are based on the salesforce org default time zone. Set the correct default timezone, because this may affect your flow execution timings.
- For scheduled paths.
- Default Workflow User – Configure workflow user.
To do all these setup, go to Home -> then search “Process Automation Settings”.
Also Read: How to Invoke a Flow from a Lightning Web Component
Scheduled Flow Limits
Before jumping directly into the use case let’s see the limits in the scheduled flow.
- The default Batch Size is 200 – Enter the number of records that this path can process at the same time. The default is 200, which is the maximum, and the minimum is 1. For example, if you specify a batch size of two and seven records are scheduled to be processed in the same time interval, Flow Builder groups them into four batches. Set a batch size smaller than 200 to improve performance and avoid hitting Apex governor limits.
- The maximum number of schedule-triggered flow interviews per 24 hours is 250,000, or the number of user licenses in your org multiplied by 200, whichever is greater.
- Max 2000 Element limit – In a flow transaction the number of flow elements is max up to 2000.
How to avoid scheduled flow records limit
- Process records in a Batch – Don’t schedule individual flow interviews for each record, consider using a batch process.
- Always try to filter the record – If possible use the start element to filter the record rather than using the get record element.
- Avoid scheduling all flow on the same day /Evaluate Schedule Frequency: – As we have a limit around schedule flow 250k record limit for 24 hours, so plan your schedule wisely.
- Avoid loops – If you want to see how to process large records in flow without a loop, you can read here.
- Monitor and Optimize: Regularly monitor the performance of your flows and identify any bottlenecks.
Also Read: How to call flow from Quick Action in Salesforce
How to add Scheduled path in flow salesforce
Use Case: Scheduled Path
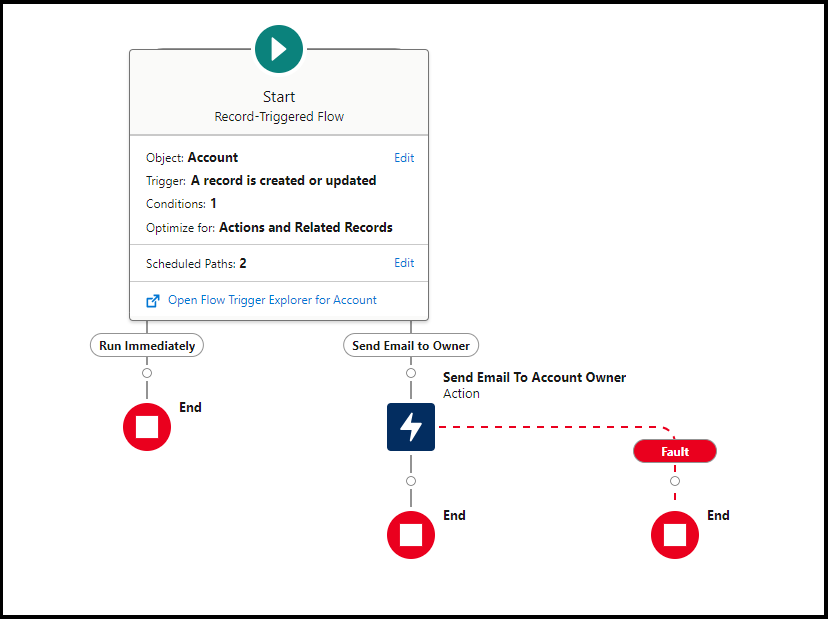
Imagine you have a subscription-based business where customers subscribe to a service, and their subscription needs to be renewed annually. To ensure timely renewal, you want to send a reminder email to customers a month before their subscription expires. For the remainder let’s send an email to the account owner.
So for this let’s use an account object and say I have a custom field called “Subscription end date“.
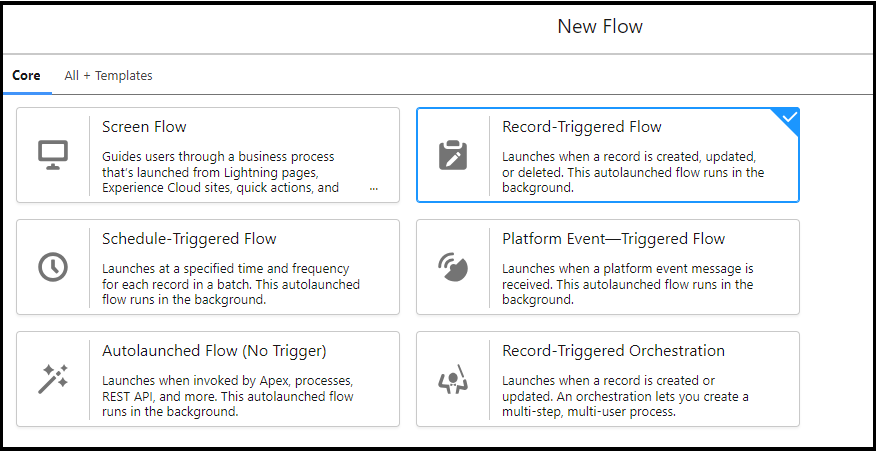
Go to setup ->Flows->and choose record Triggered flow.
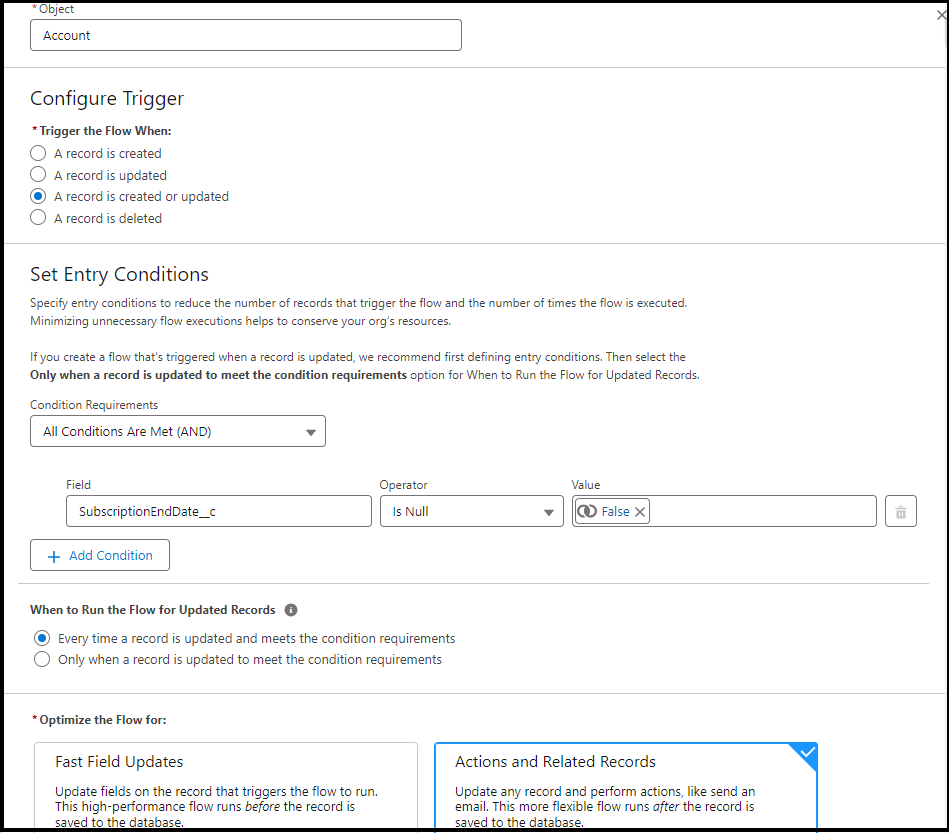
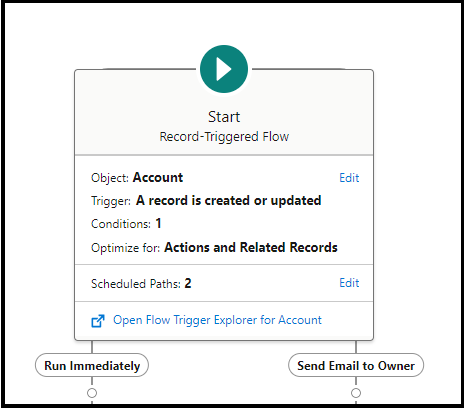
Next, choose the Object as an account and configure the trigger when the record is created or updated. And added a null check as entry criteria.
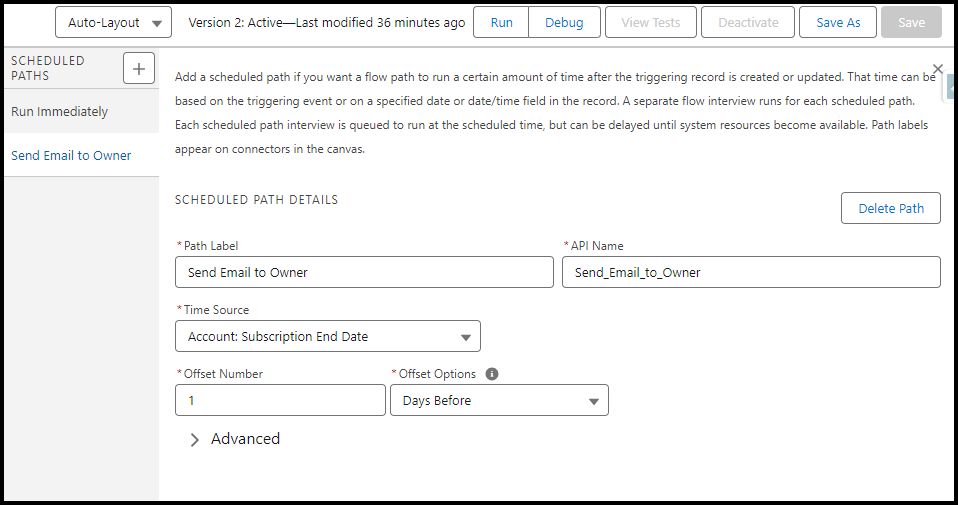
Next, click the schedule paths and configure the time source, offset Number, and offset options.
Our flow initially looks as below.
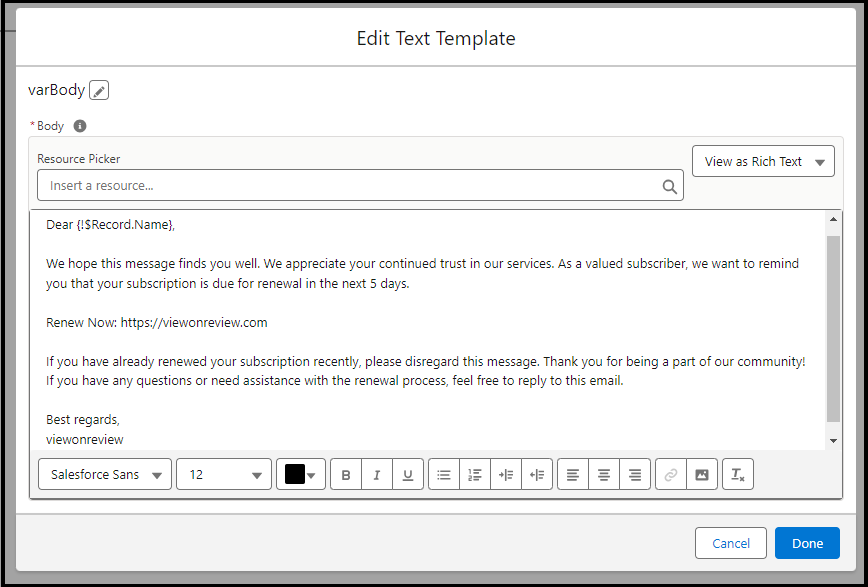
Next, learn how to configure an email to the account owner. So I have created an email body template as below by using the text template variable below.
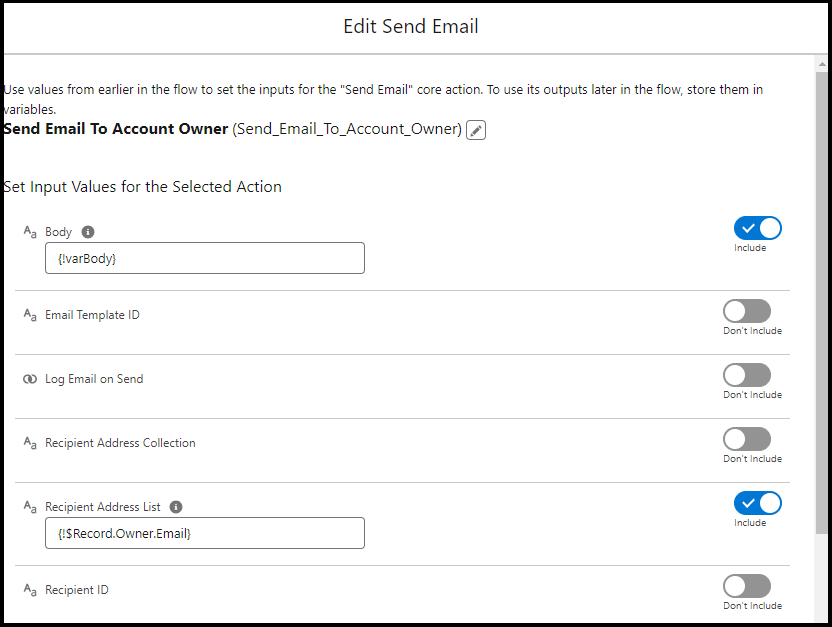
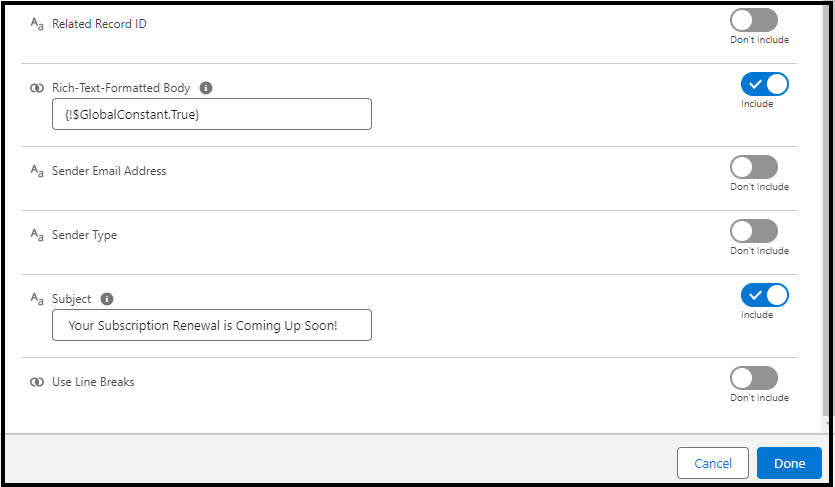
Next, add action and search for “send email” action.
Now we are completed with our flow, so let’s see the final look at it.
How to Monitor Scheduled Path in Salesforce
To monitor the Scheduled path for salesforce flow, go to ->setup ->time-based workflow.
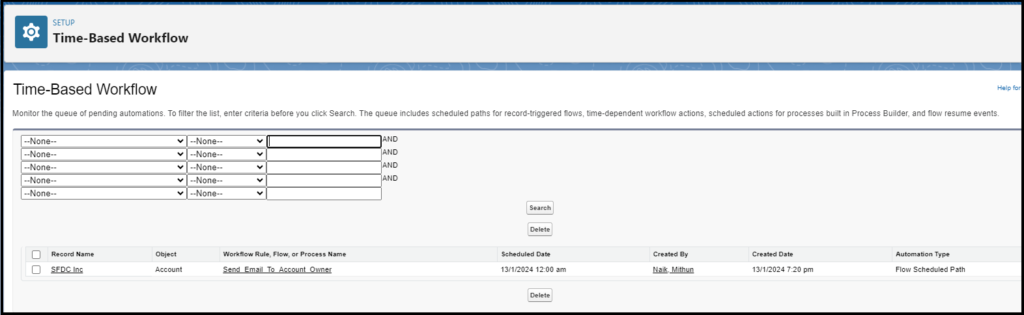
FLOW_SCHEDULED_PATH_QUEUED and FLOW_VALUE_ASSIGNMENT you can query as automation type in the above screen.
Also Read: How to use screen flow in Salesforce
How to Create a Scheduled Flow with Example
Use Case: Scheduled Trigger Flow
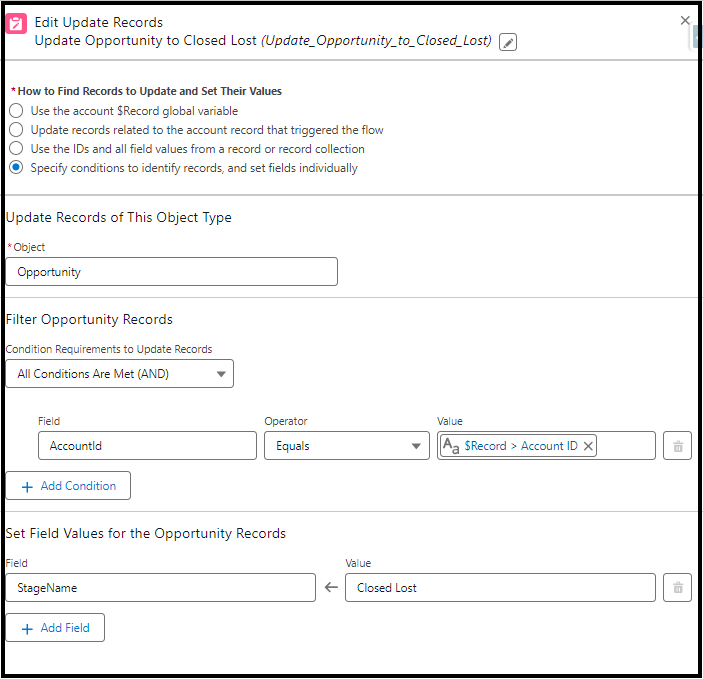
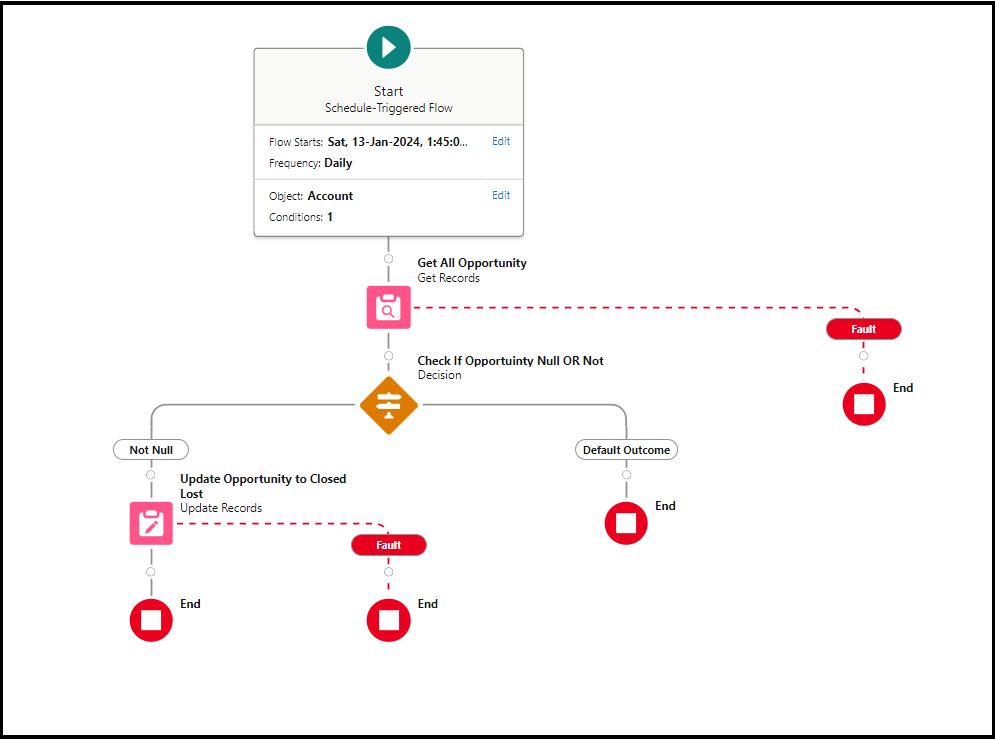
Run a daily scheduled trigger flow at 12 AM, to update the opportunity to close lost, if an account is inactivated. Filter only the Opportunity record which is not equal to closed lost or won.
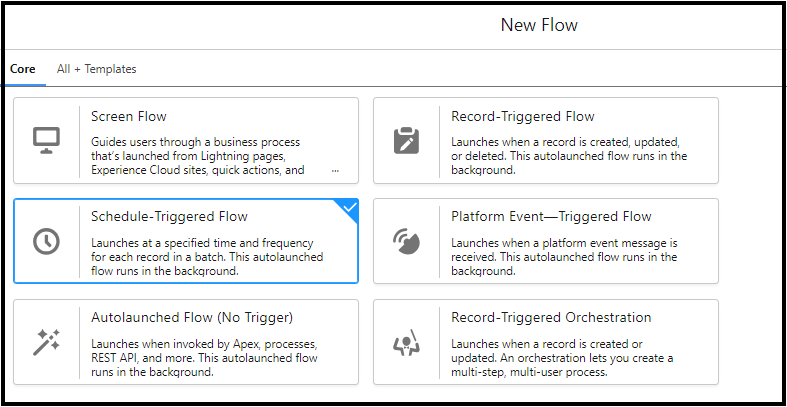
Go to setup -> Flows -> and choose scheduled trigger flow.
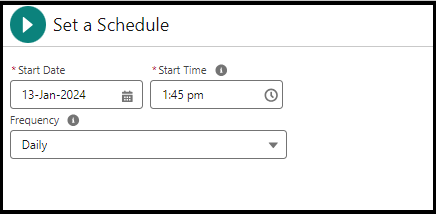
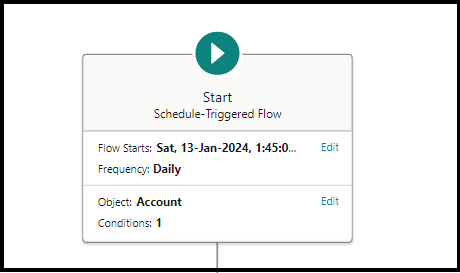
Then as per flow let’s schedule time in the flow, as below.
Then as per our use case, I need a flow on the account object, where I need to check if the account is active or not.
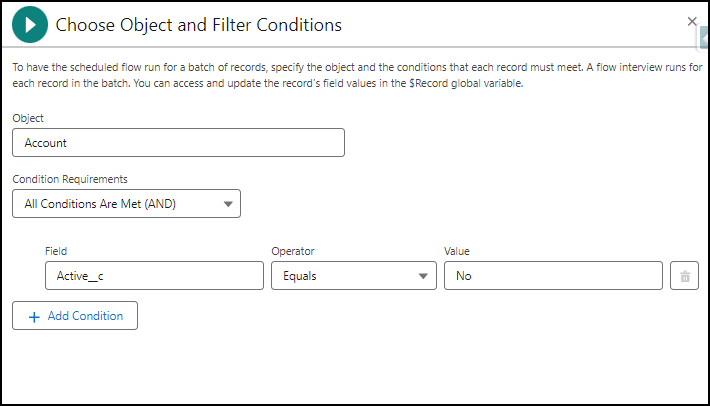
So as we added out the initial condition, let’s see how the initial flow looks like.
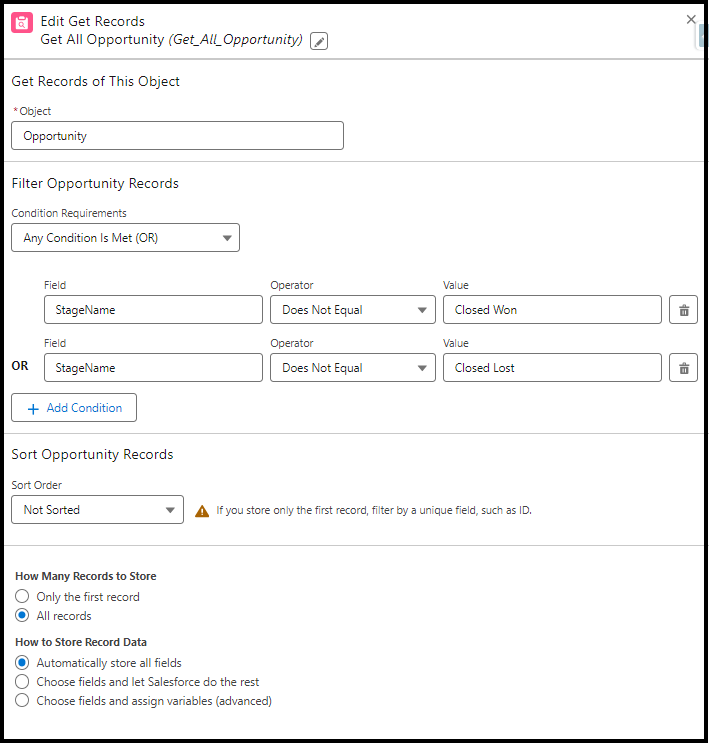
Next, will get all Opportunity records that are mapped to the account. Then will filter out the opportunity records based on stage name, and will not include the opportunity that is not equal to closed won or closed lost.
Next will add the decision check to get records to check Null.
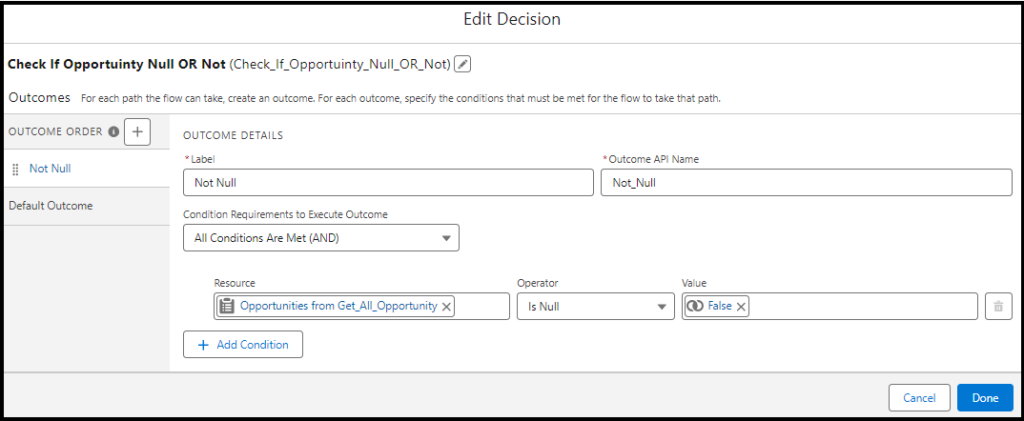
Then, If Not Null, will update the opportunity to closed Lost.
We are done with our scheduled flow, Let see what the final flow looks like.
Note: Also I advise please handle the fault path.
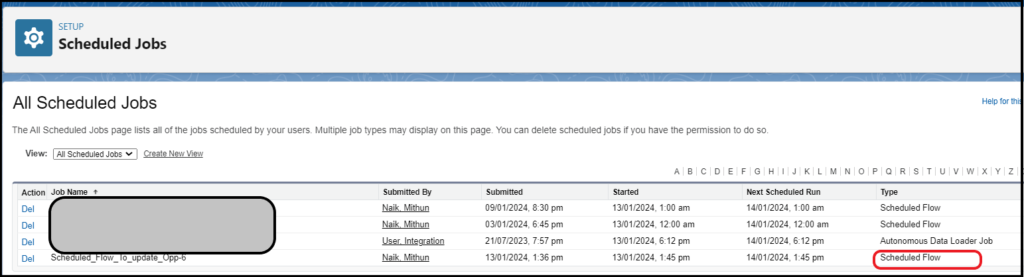
How to Monitor Scheduled Trigger Flow in Salesforce
To monitor scheduled triggered flow in salesforce you can go to Home -> scheduled Job.
Conclusion
Harnessing the power of scheduled triggered flows in Salesforce is a game-changer for automating your business processes efficiently. So by reading this blog post, we were able to understand what is scheduled triggered flow, how to use it, and the limitations of it. Also, we understood how we can use the scheduled path.
If you liked our blog post, feel free to share it with your friends. Also, follow our other blog post on Salesforce.
2 thoughts on “Schedule Triggered Flow in Salesforce”