In the winter of ’23 salesforce release introduced “Data Table” in salesforce flows. With the help of salesforce flow you can display the table of records. By using the data table in flow you can perform many actions like,
- You can select the record, and update the selected record.
- Delete the selected record.
- Display the records in table format.
In this blog post, we will understand how to create a data table in flow and what are its capabilities.
Table of Contents
Salesforce flow to display the table of records.
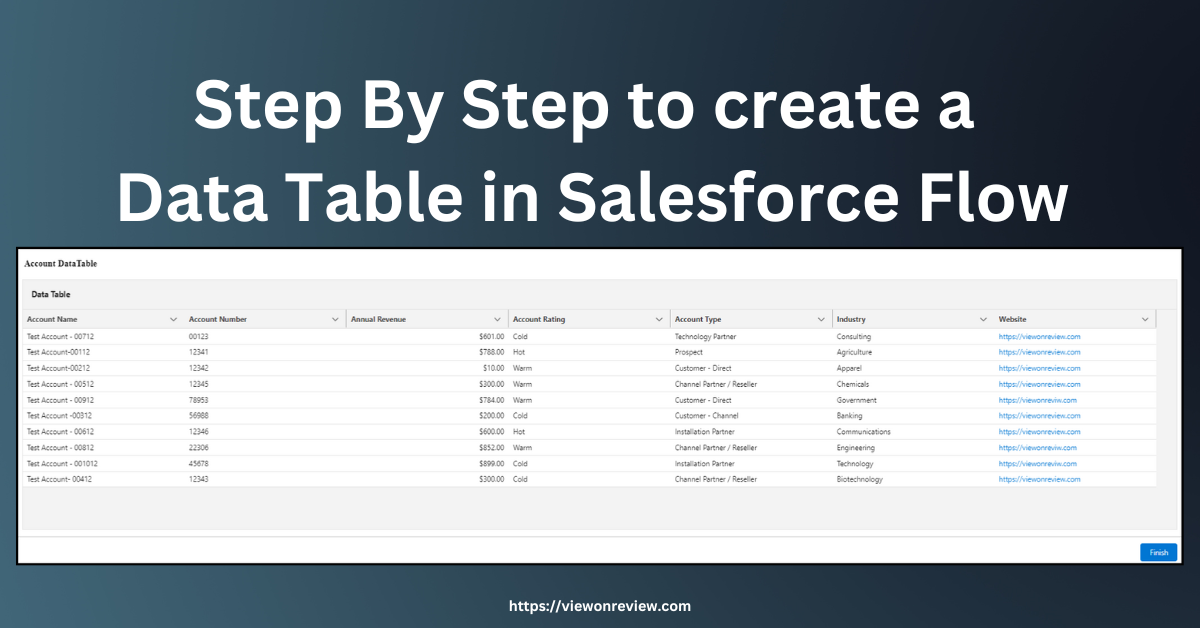
Let’s create a data table to display all records in the account, and let’s see how to create single, multiple, and view-only row selections in the data table.
To display the records/values in the data table, you need to use the “Get Records” element or use a resource of the ‘Collection’ type. To create a data table you need to choose flow as “Screen Flow“. Please follow the below step by step to understand more about creating a data table in flow.
Step 1: Define Flow Properties
- Click Setup.
- In the quick find search Flows.
- Select Flows and click New Flow.
- Choose the Screen Flow and click Create.
Read the best salesforce Books: Click Here.
Step 2: Add a Get Record Element to find the All Accounts
- On the Flow Page, click +icon, and select the Get Records element.
- Enter the label; the API Name will auto-populate.
- Choose the object as Account.
- Choose the Condition Requirements as None-Get All Account Records.
- How Many Records to Store?
- Select All records.
- How to Store Record Data.
- Select Automatically store all fields.
- Click Done.

Step 3: Add a Screen Element to display the Account in Table format
- Click +icon and add a screen element.
- Enter the label; the API Name will auto-populate.
- From the component list, search Data Table and add it to the screen.
- Data Table component, enter the API Name and Label.
- Select Use Label as the table title.
- Configure Data Source.
- Source Collection select as {!Get_Account_Records}.
- Row Selection Mode select as View Only.
- Configure Columns.
- Source Field select the field you want to show in the Data Table.
- Column Options
- select the Custom column label.
- Enter the label; the same label will be shown in the Data Table column.
- Set Component Visibility
- When to Display Component select Always.
- Advanced
- Revisited Screen Values
- Select Use values from when the user last visited this screen.
- Revisited Screen Values
- Click Done.


If All looks good, Save the flow.
- Click Save.
- Enter the Flow Label the API Name will auto-populate.
- Click Save.

Output

Read the best salesforce Books: Click Here.
Data Table to select Multiple records
In the lightning:datatable tag we can select more than one record in the Data Table. The same functionality can be achieved by using the flow Data Table component. We have three options while selecting row selection mode. Let’s explore the Multiple option. If you select the mode as Multiple then in Data Table you can select more than one record at a time.
Let’s see how we can do the multiple record selection in flow.
Step 1: Add a Screen Element to display the Data Table in multiple selection modes.
- Click +icon and add a screen element.
- Enter the label; the API Name will auto-populate.
- From the component list, search Data Table and add it to the screen.
- Data Table component, enter the API Name and Label.
- Select Use Label as the table title.
- Configure Data Source.
- Source Collection select as {!Get_Account_Records}.
- Row Selection Mode select as Multiple.
- Minimum Row Selection add 1(one).
- Maximum Row Selection add how many records you want to select. (Example: 5)
- Default Selection choose as {!varSeclectedRows}. [Either you can keep blank. Or choose a variable that was created in the Advance section].
- Configure Columns.
- Source Field select the field you want to show in the Data Table.
- Column Options
- select the Custom column label.
- Enter the label; the same label will be shown in the Data Table column.
- Set Component Visibility
- When to Display Component select Always.
- Advanced
- Revisited Screen Values
- Select Use values from when the user last visited this screen.
- Revisited Screen Values
- Click Done.

Data Table to select Single records
In the below steps let’s see how to create a single record selection in the salesforce data table.
Step 1: Add a Screen Element to display the Data Table in Single selection mode.
- Click +icon and add a screen element.
- Enter the label; the API Name will auto-populate.
- From the component list, search Data Table and add it to the screen.
- Data Table component, enter the API Name and Label.
- Select Use Label as the table title.
- Configure Data Source.
- Source Collection select as {!Get_Account_Records}.
- Row Selection Mode select as Single.
- Select Require user to make a selection if you want to add the required selection.
- Default Selection choose as {!varSeclectedRows}. [Either you can keep blank. Or choose a variable that was created in the Advance section].
- Configure Columns.
- Source Field select the field you want to show in the Data Table.
- Column Options
- select the Custom column label.
- Enter the label; the same label will be shown in the Data Table column.
- Set Component Visibility
- When to Display Component select Always.
- Advanced
- Revisited Screen Values
- Select Use values from when the user last visited this screen.
- Revisited Screen Values
- Click Done

Data Table Advance selection
In the data table advance selection, you can see the Manually assign variable checkbox, by selecting that you can see two options enabled i.e First Selected Row and Selected Rows.
Selected Rows: Holds a collection of records that is selected by the flow user.
First Selected Row: Holds the first record that is selected by the flow user.
If you need these values to process/add further logic you can use them. To hold these output values, in flow, we need to create a record variable. For the First selected Row you can create a single record variable as below.

For the Selected Rows you can create a collection record variable as below.

Revisited Screen Values
In the Advance section, you can also see the option to select the revisited screen values. If you choose
- Use values from when the user last visited this screen: If the user selects 5 records in the data table and clicks next, then again user comes back by clicking the previous button to the data table then you can still see the 5 records are being selected.
- If you have selected the above option and if you want to see the records that are selected then you need to assign the Default section that is there in Configure Data Source.
- Example: – In the previous Advance selection I created the collection record variable to hold the Selected Rows. The same record collection i will add it in the Default section because it holds the previous values that are being selected.
2. Refresh inputs to incorporate changes elsewhere in the flow: If the user selects 5 records in the data Table and clicks next, then again user comes back by clicking the previous button to the data table The selected 5 records will be refreshed, and user can select new set of records. For this in the Data Table component remove the default selection and keep it blank in the Configure Data Source section.
Conclusion
In this blog post, we completely understood how to create a Data Table in flow. Feel free to comment your thoughts and feel free to share and explore other posts.
Also Read
- Help And Training Community
- Read the best salesforce Books: Click Here.
- HTTP Callout in Salesforce Flow Without Code [GET & POST]
- How to Invoke a Flow from a Lightning Web Component
- How to update child records using salesforce flow
- How to Assign records to Queue using Salesforce Flow?
- How to create a Data Table in Salesforce Flow : Complete Guide.
- How to retrieve record Type Id in flow
- How to navigate record detail page in flow
- How to send email using flow in salesforce
- How to Display Icon In Lightning Datatable
- How to Create Record in lightning Component
- How to Delete Multiple Records Using Checkbox In Lightning Component.