Hello everyone today let’s, create a record and display the list of records using the lightning component. In the previous blog, I shared how you can build your first lightning component, component attribute, expression, etc. If you have not followed our previous post, please read here, salesforce tutorial for beginners.
Table of Contents
Save and load records with a server-side controller
In this post, I will show you, how we can perform an insert DML operation in the lightning component. As I said previously I will show you what is client and server sides are in the lightning component.
Read the best salesforce Books: Click Here.
Life Cycle of Lightning Component
The below image shows, how the lightning components work between the client and server side.
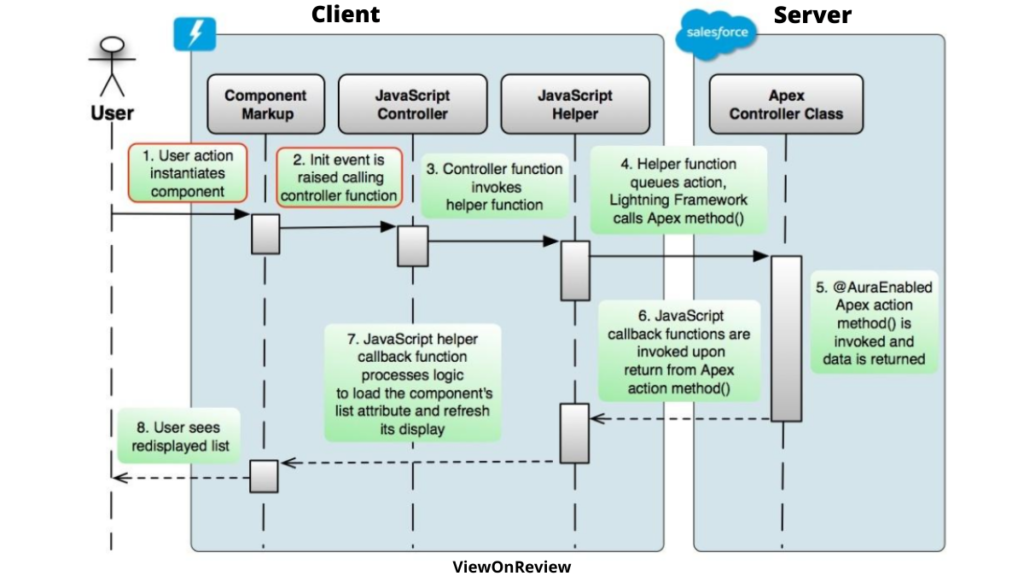
In the previous post, I have shown we have a lightning bundle, that contains a component or an app and all its related resources, in that we have 4 important components i.e component, controller, helper, and apex controller. According to that try to understand the above picture. I hope by seeing the above picture you can understand easily how data will be returned and sent to the server and the response will be stored in the client. Now let’s create a component that creates an account record.
As usual, first, we will create an apex class, that inserts the Account record and one more method to return the list of the account records.
Step 1: – Create an apex class
CreateAccount.apxc
public class CreateAccount {
    @AuraEnabled
    public static void createAcc(Account acc) {
        insert acc;
    }
    @AuraEnabled
    public static List<Account> displayAcc() {
        return [SELECT Id,name,phone,AccountNumber,Website from Account limit 10];
    }
}
@AuraEnabled – It is an annotation so that this method can be called from the lightning component. Suppose you did not mention this in your apex class, although you have called this method in the client server then the apex method will not be executed[You will get some error]. The method named createAcc will accept a parameter, the value to the parameter will be passed from the JS[client] side, and the method displayAcc will return to your list of accounts. The return list will be cached in the controller once the state is successful.
Step 2:- Create a Component file.
CreateAccount.cmp
<!--inculded controller>
<aura:component implements="force:appHostable,flexipage:availableForAllPageTypes,flexipage:availableForRecordHome,force:hasRecordId" access="global" controller="CreateAccount" >
<!--created collection attribute type[] (Array) of account-->
<aura:attribute name="AccountList" type="Account" default="{'sobjectType':'Account',
'Name':'',
'AccountNumber':'',
'Phone':'',
'Website':''}"/>
<!--attribute to display the accounts-->
<aura:attribute name="AccListToDisplay" type="Account[]"/>
<!--this handler to load the account's when page loads/Renders-->
<aura:handler name="init" value="{! this }" action="{!c.displayAccount}"/>
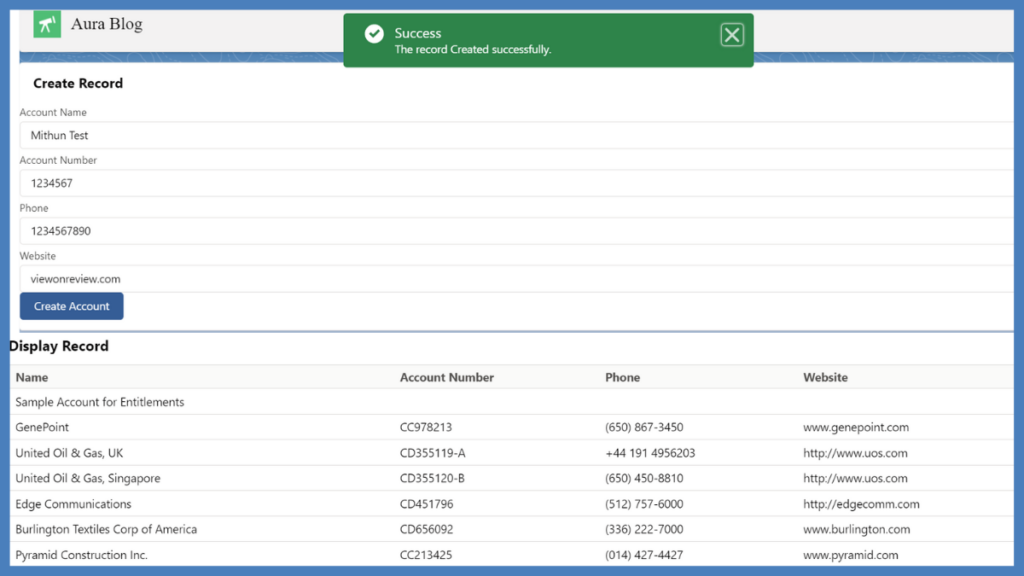
<lightning:card title="Create Record">
<lightning:input name="accName" label="Account Name " value="{!v.AccountList.Name}" />
<lightning:input name="accNumber" label="Account Number " value="{!v.AccountList.AccountNumber}" />
<lightning:input name="accPhone" label="Phone" value="{!v.AccountList.Phone}" />
<lightning:input name="accRating" label="Website" value="{!v.AccountList.Website}" />
<lightning:button variant="brand" label="Create Account" title="Brand action" onclick="{!c.CreateAccount }"/>
</lightning:card>
<!--below code to how to display records in table-->
<lightning:card title ="Display Record">
<table class="slds-table slds-table--bordered slds-table--cell-buffer">
<thead>
<tr >
<th>Name </th>
<th>Account Number</th>
<th>Phone</th>
<th>Website</th>
</tr>
</thead>
<tbody>
<!--this is iteration i.e works as for/for-each -->
<aura:iteration items="{!v.AccListToDisplay}" var="acc">
<tr>
<td>{!acc.Name}</td>
<td>{!acc.AccountNumber}</td>
<td>{!acc.Phone}</td>
<td>{!acc.Website}</td>
</tr>
</aura:iteration>
</tbody>
</table>
</lightning:card>
</aura:component>
At the start of the component, I have included implements interface, force:appHostable, flexipage:availableForAllPageTypes, flexipage:availableForRecordHome,force:hasRecordId – these refer that you can add the lightning component to a tab, App page, home page and you can get recordId of a particular record. These are the interface’s are standard, you can see while creating lightning components and when you choose these options you can see them in your Cmp file. lightning:card is used to apply a container around a related grouping of information. Aura:iteration is used to iterate over a collection on the client side. lightning:input Represents interactive controls that accept user input depending on the type attribute. And we have used a normal table tag that shows the header and data. I hope you are able to understand the CMP file, now let’s move forward to JS.
Step 3: – Create a JS file.
CreateAccount.js
({
     //This function to create an account
    CreateAccount : function(component, event, helper) {
        //Calling server-side apex method
        var action = component.get('c.createAcc');
        //Passing value to the apex  method that accepts parameter.
        //Here apex parameter is case-sensitive in js, how you have wrote in apex method same ,
        //you have to write in here as well.
        //check apex method paramter and acc below.
        action.setParams({
            "acc": component.get('v.AccountList')
        });
        action.setCallback(this, function(response) {
            //store state of response
            var state = response.getState();
            if (state === "SUCCESS") {
                //No need to worry below code.
                //This is the stadard code for toast message.

                var toastEvent = $A.get("e.force:showToast");
                toastEvent.setParams({
                    "title": "Success!",
                    "message": "The record Created successfully."
                });
                toastEvent.fire();

            }
        });
        $A.enqueueAction(action);
    },
    //This fucntion for displaying account.
    displayAccount : function(component, event, helper) {
        //Calling server-side apex method.
        var action = component.get('c.displayAcc');
        action.setCallback(this, function(response) {
            //store state of response
            var state = response.getState();
            if (state === "SUCCESS") {
                //storing response to attribute.
                //then we are using this for iteration.
                 component.set('v.AccListToDisplay', response.getReturnValue());
            }
        });
        $A.enqueueAction(action);
    }
})
As you noticed earlier, our first method createAcc accepts a parameter. The parameter value is passed from JS file using setParams. Before that, you need to Call the apex method using the component.get(‘c.createAcc’). Then you need to set the parameter and then call the setCallback and verify the state, whether success or failure, if success stores the response, that is being returned from the server-side to any attribute, etc. And also in Js code, we have added a toast message that just displays a message on UI, when the account was created.
See the difference between the two functions in one function we are calling serverside, setting a parameter, and displaying a toast message. In another method, we are calling the server-side method and storing the response value in an attribute. And that attribute value we are using in the CMP file. Yes!! Now you know how to call server-side apex class, how to pass parameter value to apex method and store the response in an attribute.
Congratulations, you have built your lighting component. Now let’s add it to an app page and see how it looks.
Step 4: – Add it to the app page.
Conclusion
In this post, we saw how to create a record and display records using the lightning component. If you liked this post feel free to share and comment your thoughts below in the comment section. In the upcoming let’s learn how to add validation to the form and how to use picklist dynamically in the lightning component. Stay Tuned, until keep share this post with your friends, and colleagues. Thank You.
Also Read
- Read the best salesforce Books: Click Here.
- HTTP Callout in Salesforce Flow Without Code [GET & POST]
- How to Invoke a Flow from a Lightning Web Component
- How to update child records using salesforce flow
- How to Assign records to Queue using Salesforce Flow?
- How to create a Data Table in Salesforce Flow : Complete Guide.
- How to retrieve record Type Id in flow
- How to navigate record detail page in flow
- How to send email using flow in salesforce
- How to Display Icon In Lightning Datatable
- How to Create Record in lightning Component
- How to Delete Multiple Records Using Checkbox In Lightning Component.
6 thoughts on “How to Create Record in lightning Component”