Hello everyone in this post let’s understand how to redirect a user to the record detail page using flow using Local Action. If you have not followed our previous blog please read here, How to send email using flow in Salesforce.
Table of Contents
How to open a Record Page after finishing Flow?
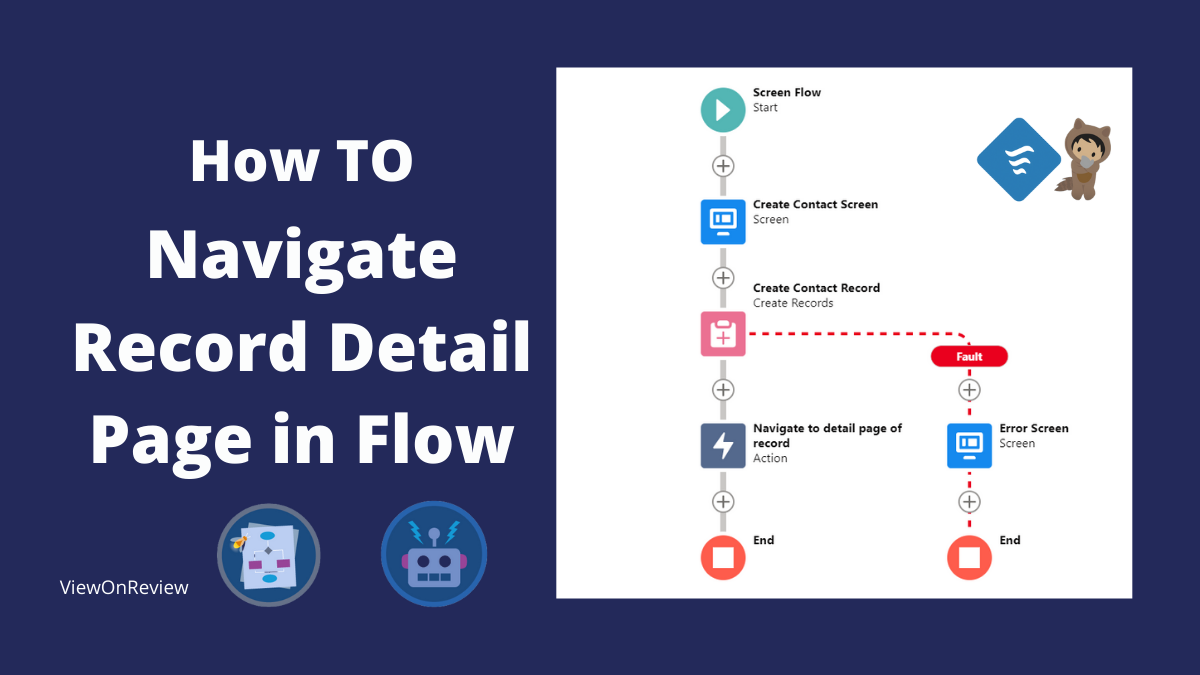
Scenario: – create a contact record, after creating navigate the user to the detail page of that record.
How to navigate the newly created record from a flow
- Create a Screen flow to accept input from users.
- Create a contact record.
- Call flow action.

Read the best salesforce Books: Click Here.
Let’s start with the implementation.
- Go to the object manager then search for flows.
- Click for a new flow to create a new one.
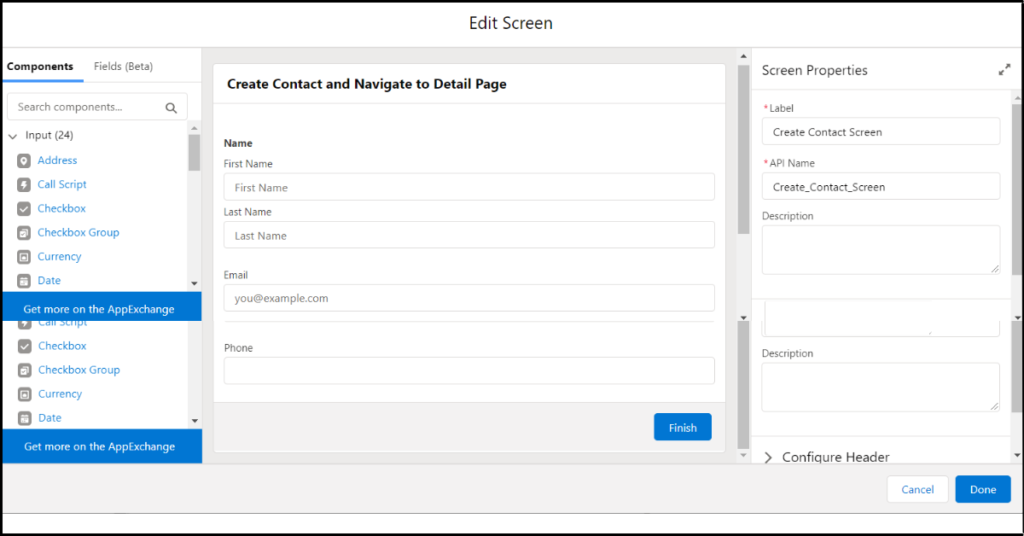
- Then Drag/Add screen interaction/element.
- Drag Name, Email, and Phone from component to screen.
- Add Api name to all dragged components.
- Add Api Name for screen: Create Contact Screen.
- Then click done.
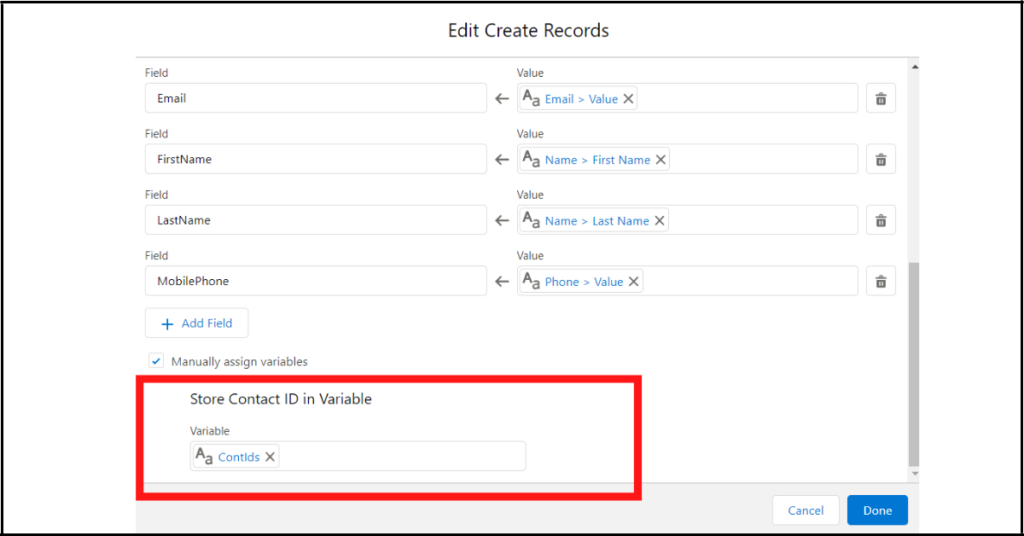
Now let’s map these fields to create a contact record.
- Drag/Add create record interaction/element to the canvas.
- Then Map the fields to the correct contact fields.
- How Many Records to Create: One.
- How to Set the Record Fields: Use separate resources and literal values.
- Create a Record of This Object: Contact.
- Email: {!Email.value}.
- FirstName: {!Name.firstName}.
- LastName: {!Name.lastName}.
- MobilePhone: {!Phone.value}.
- Manually assign variables = true.

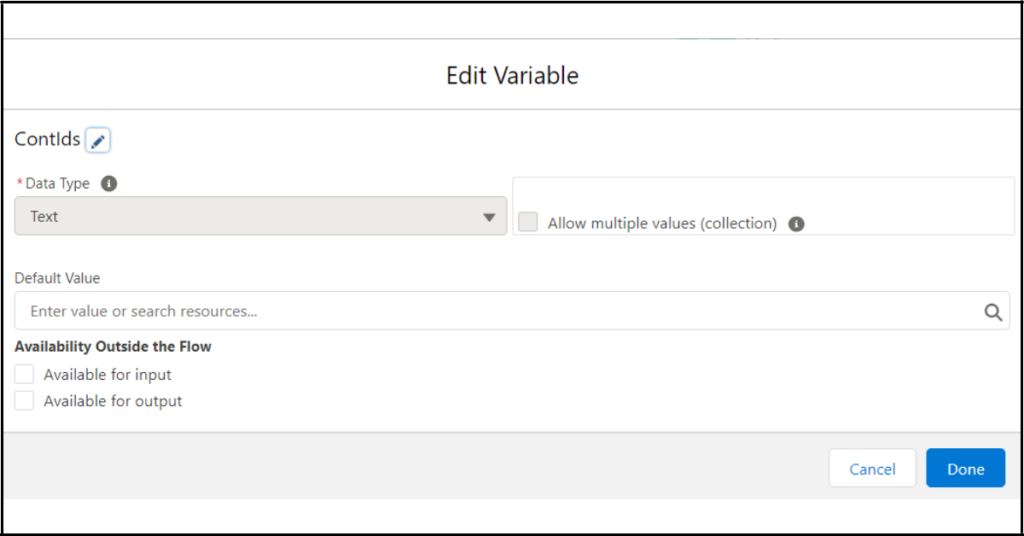
Next, we create a new resource that will store the id of a contact and then pass this id to the flow action. Let’s see how to create a new resource.
- In Store Contact ID in Variable click for new resource.
- Choose resource type as a variable.
- Add API name : ContIds.
- Data Type: Text.
- Then click done.
After creating a new resource type variable, choose the resource type in creating the record element as below.
- In-Store Contact ID in Variable: {!ContIds}.
- Then Click Done.
Now let’s create an action to navigate a user to the record detail page. To do that, we will create a new lightning component.
Go to the developer console, then create a new lightning component named DetailPageNavigation.
DetailPageNavigation.Cmp
<aura:component implements="force:lightningQuickAction,lightning:availableForFlowActions">
   <aura:attribute name="recordId" type="String" />
</aura:component>
DetailPageNavigation.Design
The recordId attribute is declared in the design resource so that it’s configurable in the local action.
<design:component>
   <design:attribute name="recordId" label="Record ID" />
</design:component>
DetailPageNavigation.Js
When the local action is executed, the flow calls the invoke method, which uses the force:navigateToSObject event to navigate to the created record.
({    invoke : function(component, event, helper) {
   // Get the record ID attribute
   var record = component.get("v.recordId");

   // Get the Lightning event that opens a record in a new tab
   var redirect = $A.get("e.force:navigateToSObject");

   // Pass the record ID to the event
   redirect.setParams({
      "recordId": record
   });

   // Open the record
   redirect.fire();
}})
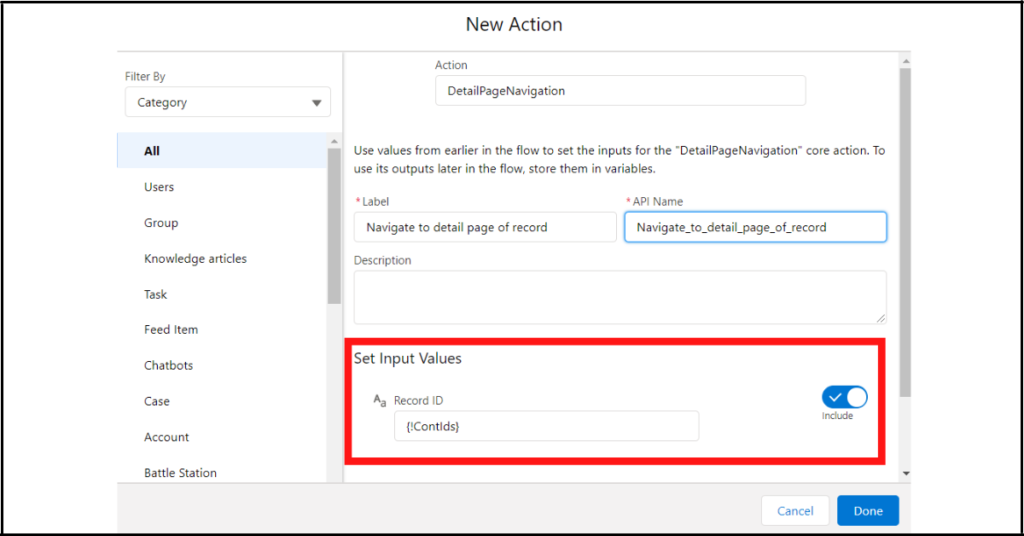
Now we are done with our lightning component, so let’s connect a lightning component to flow action. To do that follow the below steps.
- In flow drag/Add action to the canvas.
- Then search for the lightning component created: DetailPageNavigation.
- Label: Navigate to the detail page of the record.
- In Set Input Values, Choose record id to: {!ContIds}.
- Then Click Done.
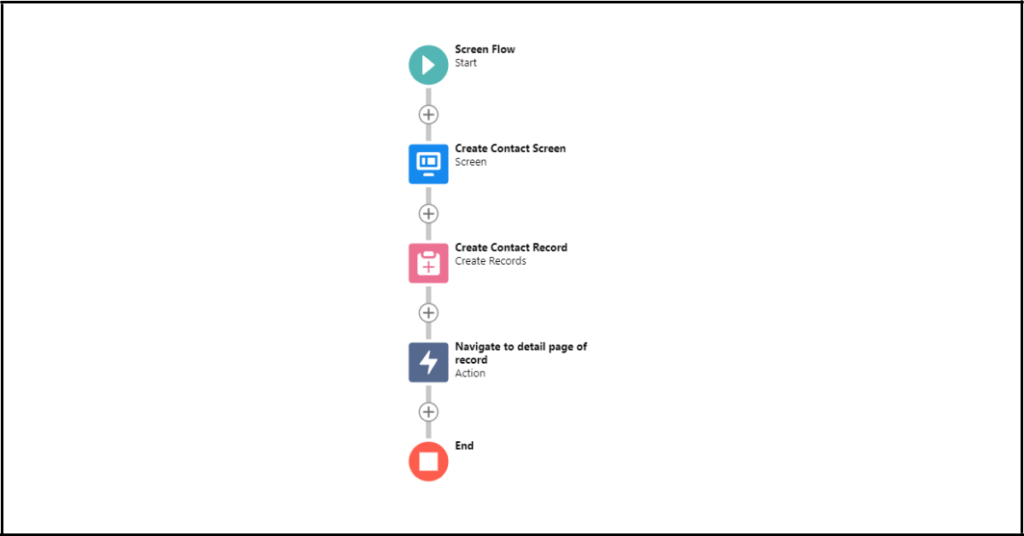
Congratulations now we are done with our flow, which will redirect a user to the detail page of the record. Let’s see how it looks.
Bonus: How to add Fault Path in Flow
Suppose your flow failed in the case of required fields or others, then how to show the error message in flow? To do that, you need to add fault errors in the flow. Let’s see how to create it.
In the contact record Lastname is the mandatory field, suppose you miss that field while creating a record, then we need to show the error message, then follow the below steps to create it.
- Click on Create Record interaction/element.
- Then click Add fault path.
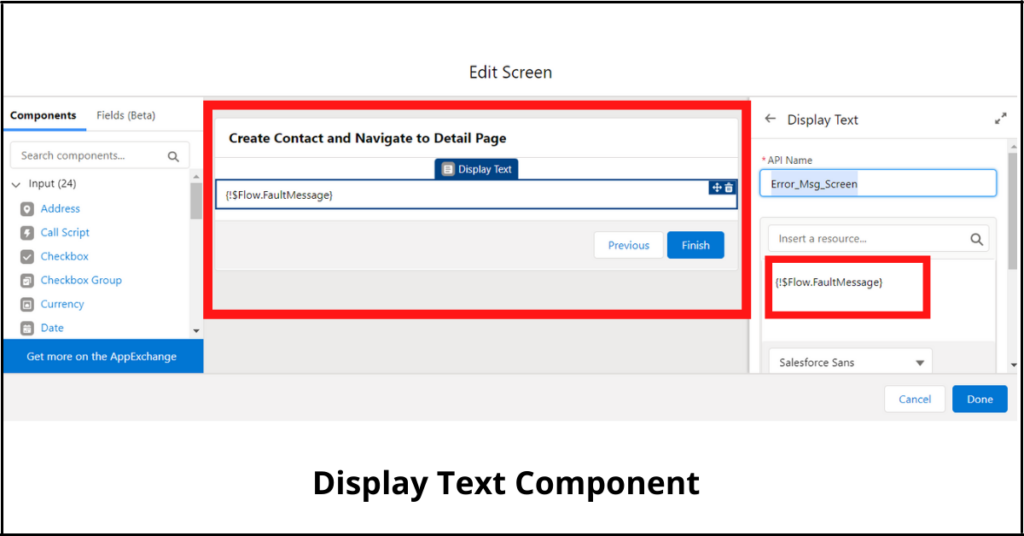
- Then add screen interaction/element.
- From the component add display text.
- Add display text API name: Error_Msg_Screen.
- Then in Insert resource add: {!$Flow.FaultMessage}.
- Then choose the API name of the screen: Error_Screen.
- and click done.

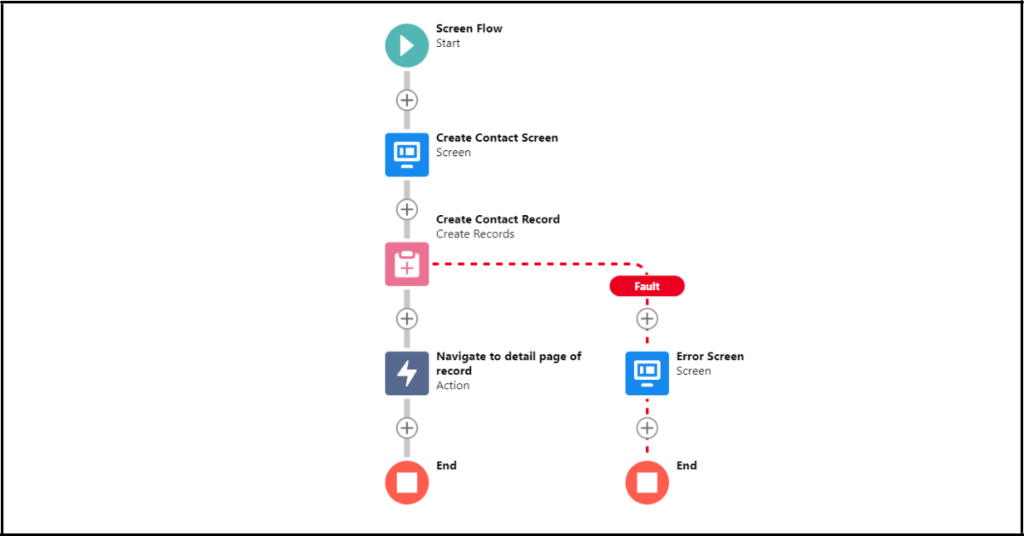
Now you are done with the fault path, let’s check out how it looks completely.
Congratulations now we are completely done with our flow. If you find this blog helpful feel free to share it with your friends. If you have not followed our other blogs, feel free to check them out.
Output
Also Read
- Help And Training Community.
- Read the best salesforce Books: Click Here.
- HTTP Callout in Salesforce Flow Without Code [GET & POST]
- How to Invoke a Flow from a Lightning Web Component
- How to update child records using salesforce flow
- How to Assign records to Queue using Salesforce Flow?
- How to create a Data Table in Salesforce Flow : Complete Guide.
- How to retrieve record Type Id in flow
- How to navigate record detail page in flow
- How to send email using flow in salesforce
- How to Display Icon In Lightning Datatable
- How to Create Record in lightning Component
- How to Delete Multiple Records Using Checkbox In Lightning Component.
Hi will this work in a customer community portal?
Redirection is not working , it stuck on the flow finished screen.
Hi Ankit,
Hope you have created Aura component. Add some debug logs in it,and check from flow whether record is passing or not. Let me know if you need further assistance.