
Updating related records is a common task in Salesforce, and it can be accomplished in many different ways. One way to achieve this is by using a flow, which is a powerful tool that allows you to automate processes and streamline workflows.
In this blog post, we will walk you through the process of updating child records using a loop element in Salesforce flow.
Table of Contents
Problem Statement
If the Account is marked as inactive i.e., Active as, “No”, then update all the related opportunities that are not equal to the closed won or closed Lost stage, then update the opportunity stage to the Closed Lost.
Also, read how to create a Data Table in Salesforce Flow.
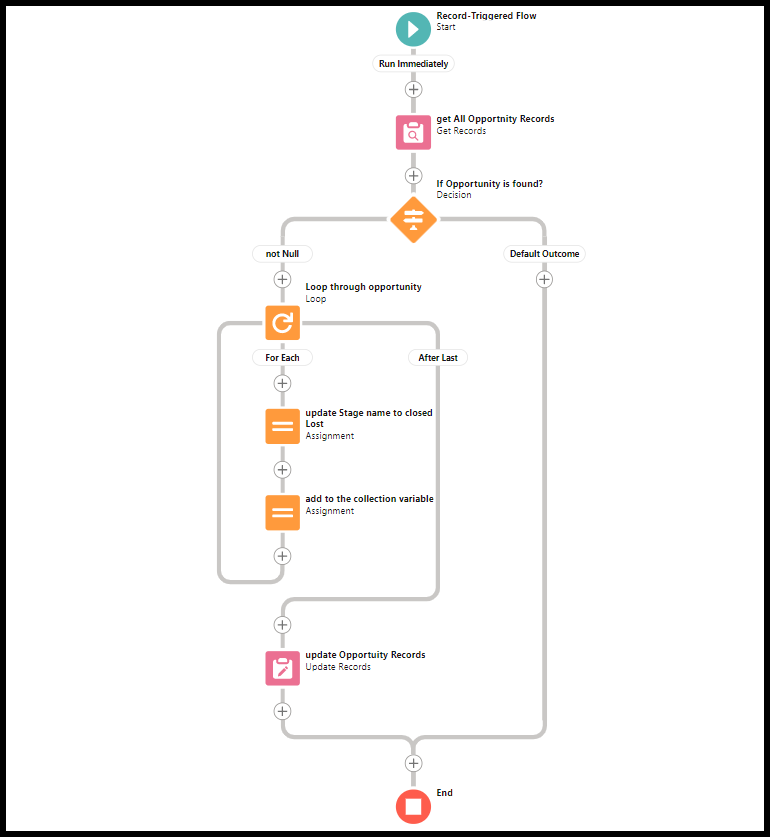
Step 1: Create a Flow
The first step is to create a new flow. To do this, go to Setup > Flows > New Flow. Select “Record-Triggered Flow” as the type of flow.
Read the best salesforce Books: Click Here.
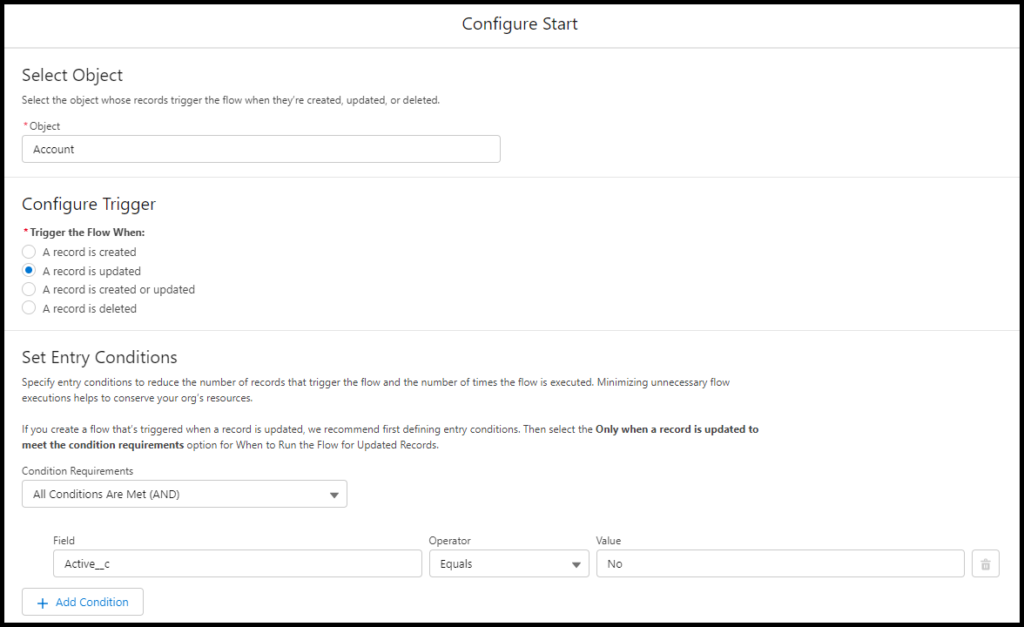
Step 2: Choose the Object and Trigger.
Next, choose the object as Account And choose the configure trigger as “A record is updated”. Then set the entry conditions as below,
- Active Field(Active__c) Equals as Value “No”.
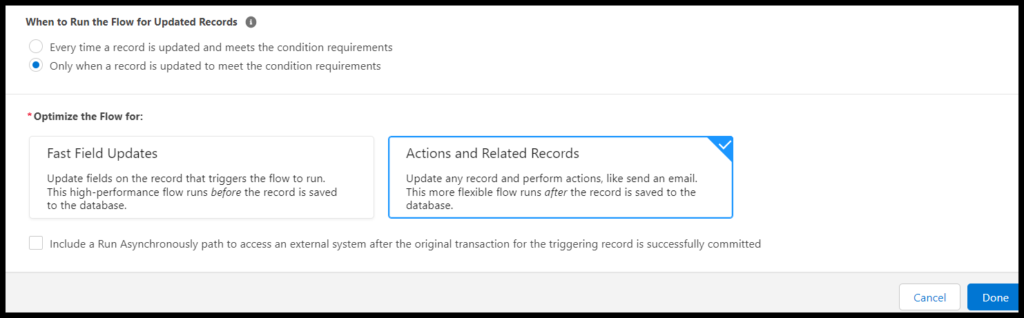
- When to Run the Flow for Updated Records as,
- Only when a record is updated to meet the condition requirements.
- Optimize the Flow for as,
- Actions and Related Records.
- Then Click Done.
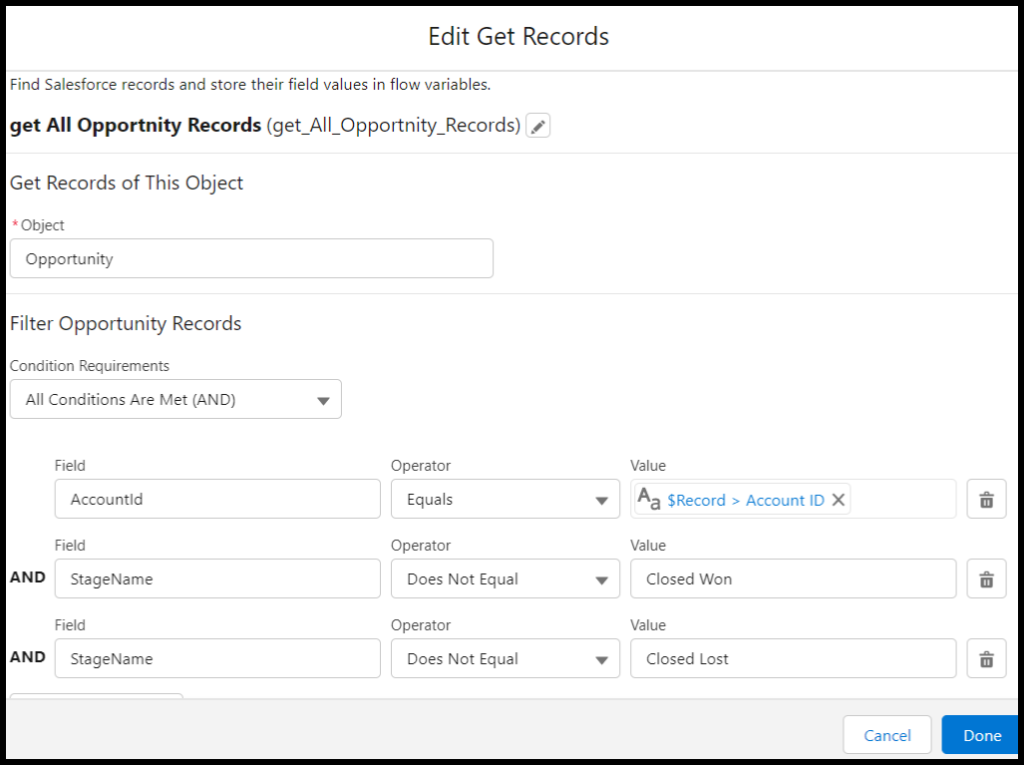
Step 3: Add the Get Record Element.
Add the Get record element to the canvas. Add the criteria to get all the related opportunities of an account which is not equal to closed won or closed lost as the stage name. So our flow condition should be as below.
- Object as Opportunity.
- Filter Opportunity Records: All Conditions Are Met(AND).
- Choose Field AccountId Equals to Value as $Record>Account ID. [We need to update here only the Opportunity records that belong to the triggered account record, hence this condition is needed].
- Choose StageName Equals to Value as Closed Won.
- Choose StageName Equals to Value as Closed Lost.
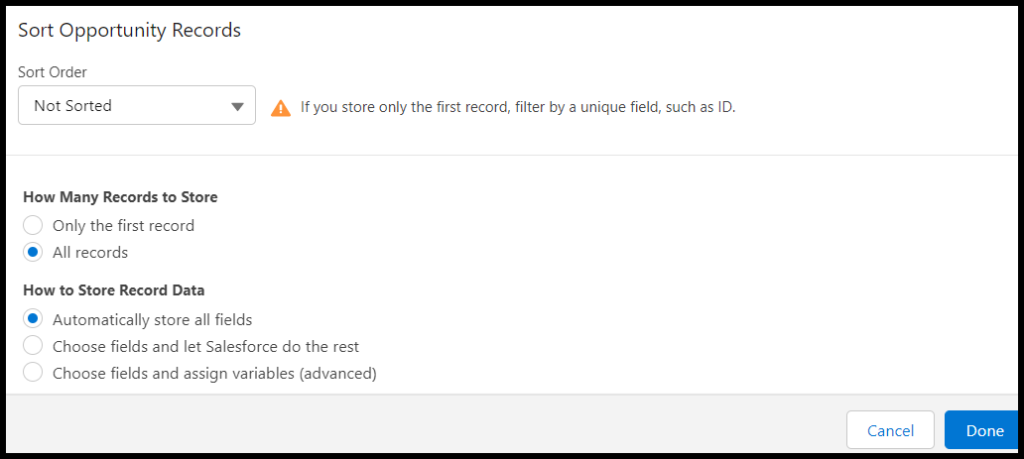
- How Many Records to Store: Choose All Records.
- How to Store Record Data: Automatically store all fields.
- Then Click Done.
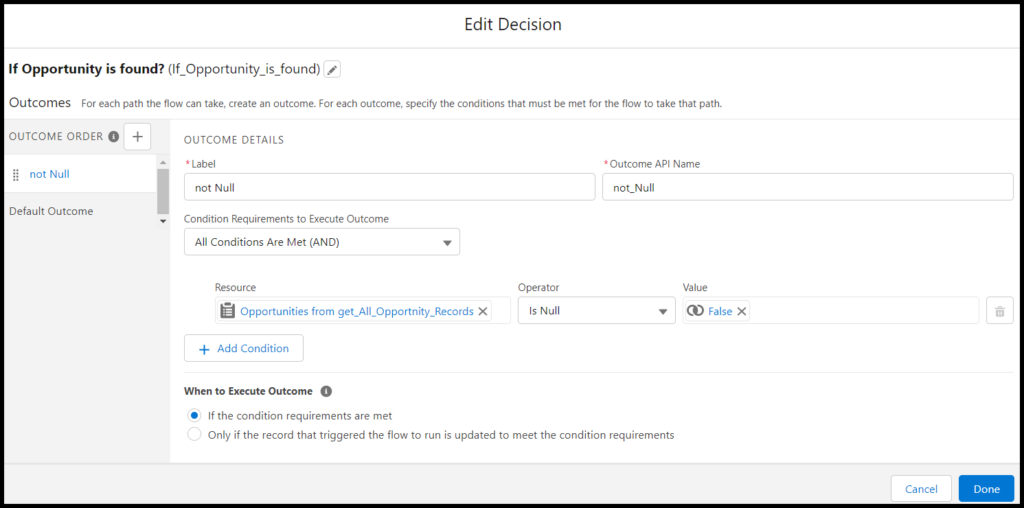
Step 4: Check If the get records are Null.
I have added the decision element to check whether the value from the get record element is null or not. So our condition should be as follows.
- Click the Plus icon to add the outcome.
- Add the label and API Name.
- Condition Requirements to Execute Outcome: All Conditions Are Met(AND).
- {!get_All_Opportnity_Records}[Step 3] is Null as value “False”.
- Then click Done.
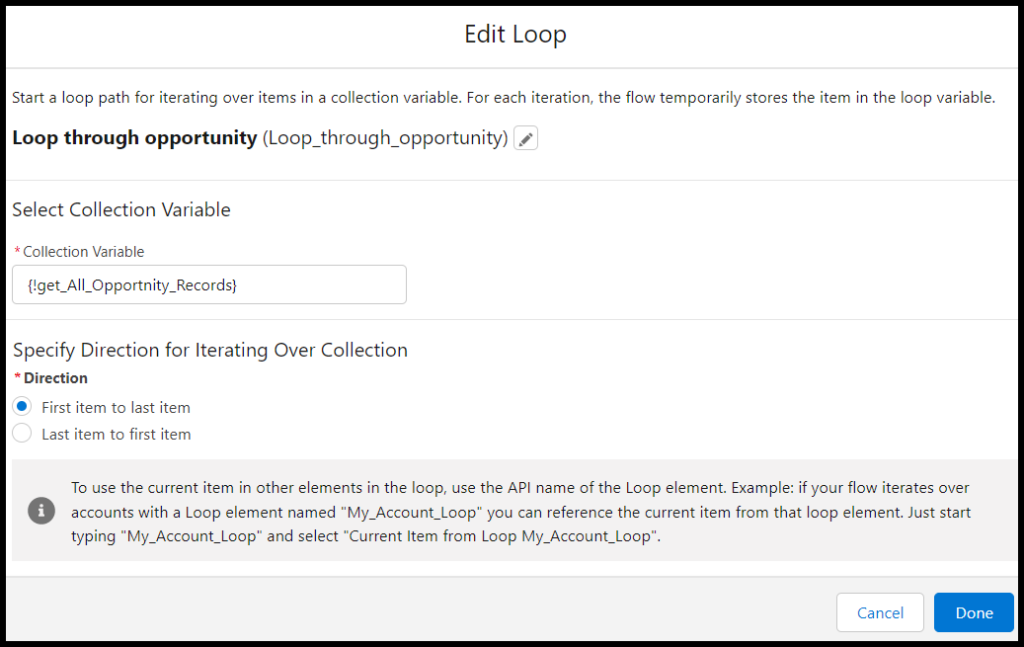
Step 5: Loop Through all Opportunity Records.
In the loop element, we will process through one by one records and we will update the stage name and all the processed records we will add in the record collection variable using the Assignment element.
In the Loop element choose the collection variable as {!get_All_Opportnity_Records} [Step 3].
Step:6 Add assignment element to update stage Name & to add records to collection variable.
In this step, we will add two assignment elements. One is to update the processed records from the Loop to stage as closed lost. And one more to add the records to the collection variable. So let’s create the first assignment element as per below.
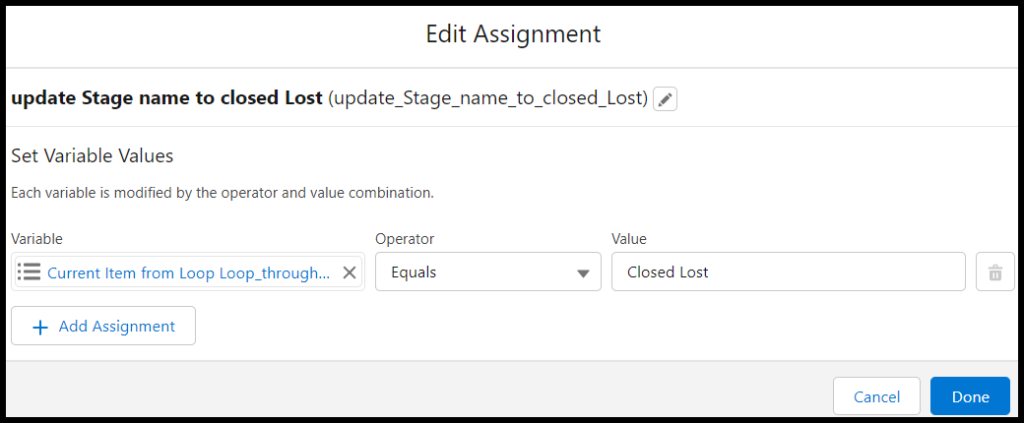
Note: {!Loop_through_opportunity.StageName} is a variable in the assignment record that is processed from the loop.
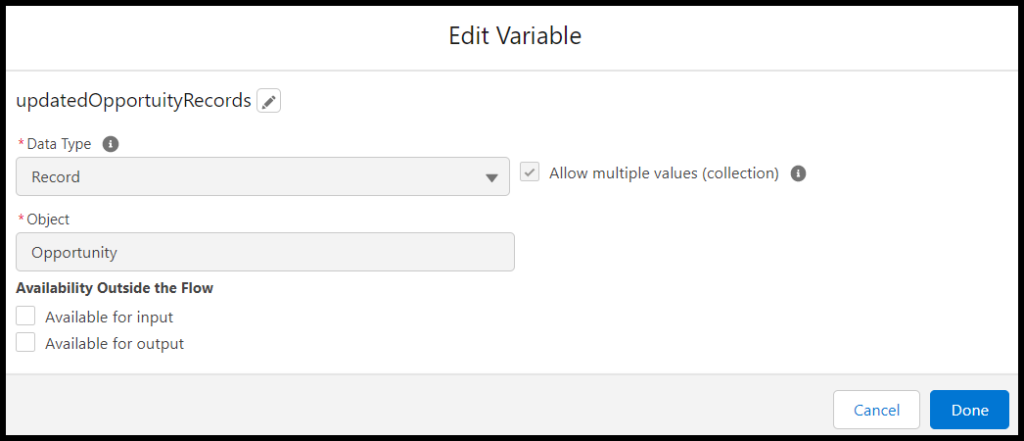
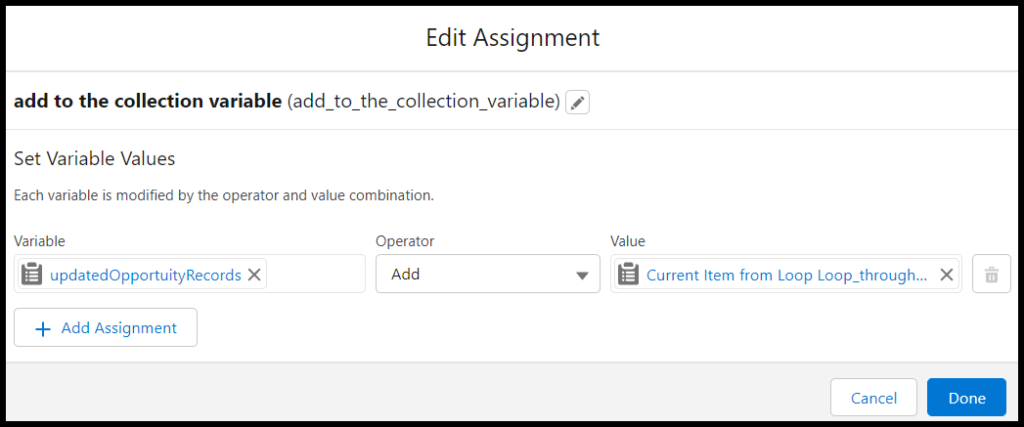
Next, we will add the records to the collection variable. Before that let’s create a collection variable as per the below image.
Then, will add the records to the collection variable using another assignment element, as per below.
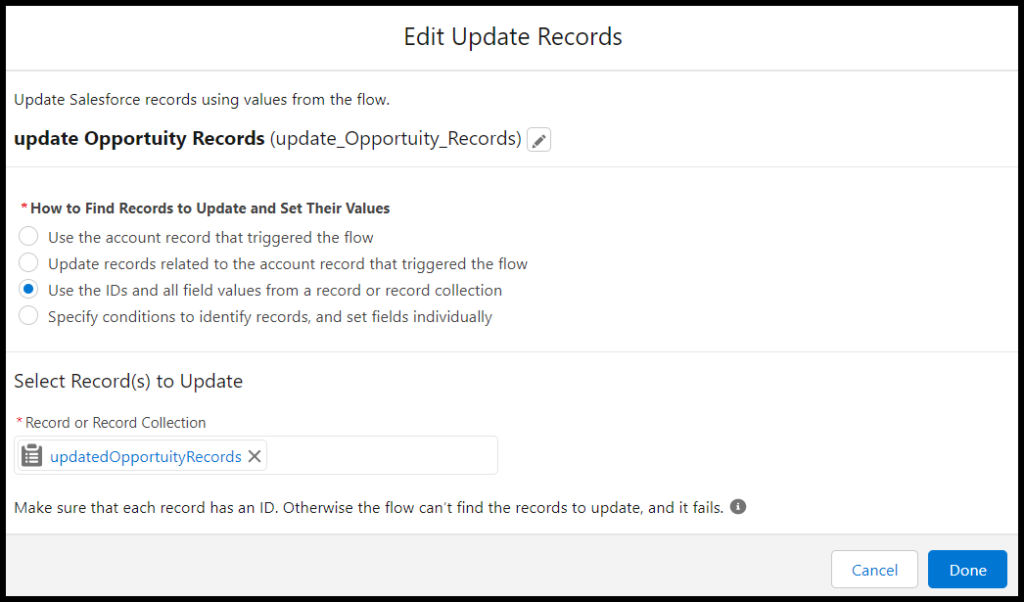
Step 7: Update the records.
The Update Records element allows you to update one or more records at the same time. To use this element to update the related records, you need to specify the record or records you want to update and the fields you want to update. So in our case, we will choose the record collection variable to update.
- How to Find Records to Update and Set Their Values, as
- Choose Use the IDs and all field values from a record or record collection.
- Select Record(s) to Update as,
- {!updatedOpportuityRecords} [Step 6]
- Then Click Done.
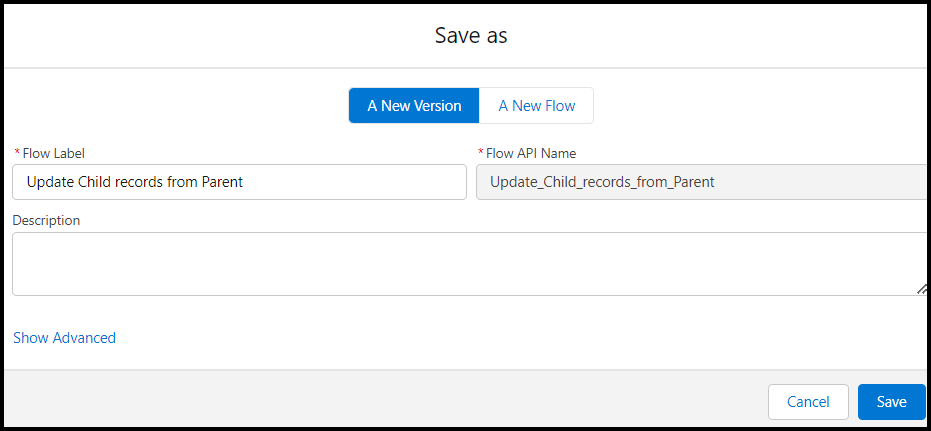
Step 8: Save the Flow
Add the label and API name of flow and Save.
Conclusion
Updating related records using a flow is a powerful tool that can save you time and effort. By following the steps outlined in this blog post, you can create a flow that updates related records in your Salesforce organization with ease.
If you have not followed our previous blog, then read it here.
Related Quick Links
- Read the best salesforce Books: Click Here.
- HTTP Callout in Salesforce Flow Without Code [GET & POST]
- How to Invoke a Flow from a Lightning Web Component
- How to update child records using salesforce flow
- How to Assign records to Queue using Salesforce Flow?
- How to create a Data Table in Salesforce Flow : Complete Guide.
- How to retrieve record Type Id in flow
- How to navigate record detail page in flow
- How to send email using flow in salesforce
- How to Display Icon In Lightning Datatable
- How to Create Record in lightning Component
- How to Delete Multiple Records Using Checkbox In Lightning Component.
In the second part of step 6, where you add the value to the record collection variable, can you please show the full value of the Current Item from Loop? I’m working on a similar
Hi Kp,
Please find the below snap. If you need more info, pls let me know.
Thanks,
Mithun
Thanks!